Javaweb——Spring Boot 系列(14)数据缓存相关技术
本文共 7801 字,大约阅读时间需要 26 分钟。
数据缓存技术
一、为什么需要数据缓存
- 实际生活场景中,web 应用的后台数据库都不会像开发环境中为了测试功能,在数据库就添加了几百条甚至更少的数据记录那样,实际场景中的后台数据库的数据量往往数以万计,因此数据库往往存放存储介质中,一般是大容量的硬盘,不会直接存放在内存中。
- 然而,无论硬盘多么好,其读写速度都比不过内存的读写速度,一旦我们访问数据或提交数据,特别是大量数据时,势必因为硬盘读写速度的跟不上,导致整个程序停留在数据库查询或提交数据这一个环节,给用户带来一种程序卡顿的体验,这势必会导致用户的流失。
- 为了避免因为直接与硬盘交互导致程序运行缓慢,势必应用一种介于硬盘和内存之间对读写速度进行处理的东西,这就是缓存。
- 一般位于硬盘和内存之间有两级缓存,与内存直接挂钩的采用高速缓存,其读写速率接近内存;而与硬盘挂钩的采用低速缓存。
二、Spring 对缓存的支持
- Spring 在 cache 中定义了 CacheManager 和 Cache 两个类来统一不同的缓存技术,前者是各种缓存技术的抽象接口,后者是缓存的各种操作(增加、删除、获得缓存)。
1、Spring 支持的缓存技术
- Spring 用不同的 CacheManager 对不同的缓存技术进行管理,Spring 支持的缓存技术如下:
缓存方式 对应的 CacheManager 描述 Collection SimpleCacheManager 使用简单的 Collection 来存储缓存,主要用于测试 ConcurrentMap ConcurrentMapCacheManager 使用 ConcurrentMap 来存储缓存 无 NoOpCacheManager 仅测试用途,不会实际存储缓存 EhCache EhCacheCacheManager 使用 EhCache 做为缓存技术 GuavaCache GuavaCacheManager 使用 Google Guava 的 GuavaCache 作为缓存技术 Hazelcast HazelcastCacheManager 使用 Hazelcast 作为缓存技术 JCache JCacheCacheManager 支持 JCache(JSR-107)标准的实现作为缓存技术,如 Apache Commons JCS Redis RedisCacheManager 使用 Redis 作为缓存技术
2、缓存注解
- Spring 提供了 4 个注解来声明缓存规则,如下:
注解 作用 @Cacheable 在执行注解了该注解的方法前,查看缓存中是否有目标数据,有则直接返回数据,否则调用方法并将方法的返回值放入缓存中 @CachePut 将方法的返回值放入缓存中;该注解的属性要与 @Cacheable 注解的属性保持一致 @CacheEvict 将一条或多条数据从缓存中删除 @Caching 组合多个注解策略在一个方法上 - 这几个注解都有一个 value 属性用于指定缓存名称,也都有一个 key 属性指定数据在缓存中的存储的键。
3、如何开启 Spring 对声明式缓存的支持
- 要开启声明式缓存的支持,操作颇为简单,只需在配置类上使用 @EnableCaching 注解就可以了。
4、Spring Boot 对缓存的支持
- Spring Boot 在 autoconfigure.cache 中对各种 CacheManager 进行了许多自动配置,在不做任何额外配置的情况下,默认使用的是 SimpleCacheConfiguration(ConcurrentMap),当然我们可以在 application.properties 中使用前缀 spring.cache 加相关具体属性来进行修改配置,如下:
spring.cache.type= #可选 generic、ehcache、hazelcast、infinispan、jcache、redis、guava、simple、nonespring.cache.cache-name= #程序启动时创建缓存名称spring.cache.ehcache.config= # ehcache 配置文件的地址spring.cache.hazelcast.config= # 同上spring.cache.infinispan.config= #同上spring.cache.jcache.config= #同上spring.cache.jcache.provider= # 当多个 jcache 实现在类路径的时候,指定 jcache 实现spring.cache.guava.spec= # guava specs
三、项目示例
- 以简单的项目测试数据缓存。
1、新建项目和配置
- 使用 IDEA 新建一个 Spring Boot 项目,初始依赖选择 Cache、JPA 和 Web,并手动添加 Oracle 数据库的驱动包 ojdbc6.jar,POM 文件如下:
4.0.0 org.springframework.boot spring-boot-starter-parent 1.3.0.M2 com.pyc mycache 0.0.1-SNAPSHOT mycache jar Demo project for Spring Boot 1.8 com.oracle ojdbc6 11.2.0.2.0 org.springframework.boot spring-boot-starter-cache org.springframework.boot spring-boot-starter-data-jpa org.springframework.boot spring-boot-starter-web org.springframework.boot spring-boot-starter-test test org.junit.vintage junit-vintage-engine org.springframework.boot spring-boot-maven-plugin - application.properties 中的内容先保持和上一篇的一样。
2、Entity 和 Repository
- 仍旧用 Person 这个数据表,因此实体类和实体类的 Repository 和上一篇的一样。
3、Business Service
- 在这一项目中,同样要用业务服务的逻辑,一个服务接口和接口实现类。
3.1、Service Interface
- 首先是一个服务接口,是一个虚类,代码如下:
package com.pyc.mycache.service;import com.pyc.mycache.domain.Person;public interface DemoService { public Person save(Person person); public void remove(Long id); public Person findOne(Person person);} - 定义了三个方法,分别对应将数据写入缓存、从缓存中删除数据和从缓存中查找某个数据三种操作。
3.2、Service Implements
- 对上面的服务接口进行具体实现,代码如下:
package com.pyc.mycache.service.impl;import com.pyc.mycache.dao.PersonRepository;import com.pyc.mycache.domain.Person;import com.pyc.mycache.service.DemoService;import org.springframework.beans.factory.annotation.Autowired;import org.springframework.cache.annotation.CacheEvict;import org.springframework.cache.annotation.CachePut;import org.springframework.cache.annotation.Cacheable;import org.springframework.stereotype.Service;@Servicepublic class DemoServiceImpl implements DemoService { @Autowired PersonRepository personRepository; @Override // 缓存新增的或更新的数据到缓存,缓存名称为 people,数据的 key 时 person 的 id // Caching new or updated data to the cache, //the cache name is people, and the key of the data is the person's id @CachePut(value = "people", key = "#person.id") public Person save(Person person) { Person p = personRepository.save(person); System.out.println("为id,key 为:" + p.getId() + "的数据做了缓存"); return p; } @Override // 从缓存 people 中删除 key 为 id 的数据 // delete the data from cache called people where key value equal of the parameter id @CacheEvict(value = "people") public void remove(Long id) { System.out.println("删除了id, key 为" + id + "的数据缓存"); personRepository.delete(id); } @Override // 缓存 key 为 person.id 的数据到缓存 people 中 // Caching the data that key is parameter person's id into cache called people @Cacheable(value = "people", key = "#person.id") public Person findOne(Person person) { Person p = personRepository.findOne(person.getId()); System.out.println("为 id,key 为" + p.getId() + "的数据做了缓存"); return p; }}
4、Controller
- 同样的,View 层无法对上文的接口方法直接调用,须得在控制层中生成相应的 URL 才能访问。
package com.pyc.mycache.web;import com.pyc.mycache.domain.Person;import com.pyc.mycache.service.DemoService;import org.springframework.beans.factory.annotation.Autowired;import org.springframework.web.bind.annotation.RequestMapping;import org.springframework.web.bind.annotation.RestController;@RestControllerpublic class CacheController { @Autowired DemoService demoService; @RequestMapping("/put") public Person put(Person person){ return demoService.save(person); } @RequestMapping("/able") public Person cacheable(Person person){ return demoService.findOne(person); } @RequestMapping("/evit") public String evit(Long id){ demoService.remove(id); return "ok"; }}
5、注解入口类开启缓存支持
- 在入口类上使用 @EnableCaching 开启缓存支持
import org.springframework.boot.SpringApplication;import org.springframework.boot.autoconfigure.SpringBootApplication;import org.springframework.cache.annotation.EnableCaching;@SpringBootApplication@EnableCachingpublic class MycacheApplication { public static void main(String[] args) { SpringApplication.run(MycacheApplication.class, args); }}
6、运行测试
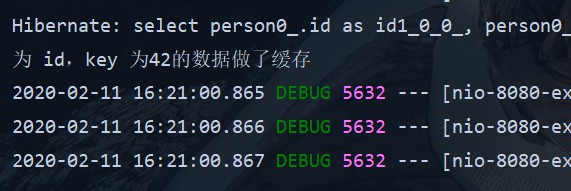
- 先对 @Cacheable 进行测试,访问 localhost:8080/able?id=42
- 控制台输出如下图:
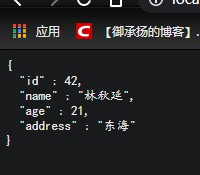
- 浏览器获得返回的数据
- 再次访问同样的路径,控制台不在输出对某某数据做了缓存的字样。
- 测试 @CachePut,访问 localhost:8080/put?name=ty&address=sf&age=22
- 控制台提示

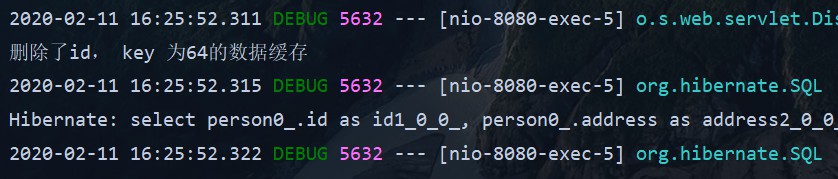
- 再测试 @CacheEvit,访问 localhost:8080/evit?id=64,同样的控制太输出提示信息:
- 初步测试,功能正常。
四、转换缓存技术
- 让项目从 Spring Boot 默认的缓存技术转换为其他缓存技术,例如 EhCache、Guava 或 Redis 的操作都比较简单,只需对 POM 文件添加相关依赖,以及用个 XML 文档对该缓存技术进行配置即可。
- 例如 EhCache,先在 POM 文件中增加如下代码:
net.sf.ehcache ehcache - 再在 Resources 目录下新建一个 ehcache.xml 文件,编辑内容如下:
- 其他的缓存技术的切换也差不多是这个步骤。
转载地址:http://ulqgn.baihongyu.com/
你可能感兴趣的文章
SQLite Tutorial 4 : How to export SQLite file into CSV or Excel file
查看>>
how to move pivot to origin
查看>>
Optimizate objective function in matrix
查看>>
Convert polygon faces to triangles or quadrangles
查看>>
How do I divide matrix elements by column sums in MATLAB?
查看>>
read obj in matlab
查看>>
find out the neighbour matrix of a mesh
查看>>
Operators and special characters in matlab
查看>>
As-Conformal-As-Possible Surface Registration
查看>>
qmake Variable Reference
查看>>
ML 14 part2 principal component analysis
查看>>
Lesson 2 Gradient Desent
查看>>
lesson 5 memory model
查看>>
lesson 6 threads synchronization
查看>>
lesson 7 strategies for efficient CUDA programming
查看>>
using cuda7.0 in matlab2015b with vs2013 compiler
查看>>
convert RGB image with hole into binary image with hole filled
查看>>
rotate object in matlab
查看>>
find border vertex
查看>>
matlab sliced variable
查看>>